
It is fascinating that the invention of motion pictures was born from a question about horses: do all four hooves leave the ground simultaneously when a horse gallops? The answer, famously captured by Eadweard Muybridge, was yes — for a split second, the horse is completely suspended in mid-air as it transitions from pulling with the front legs to pushing with the back.
While shifting on the violin or viola involves very different movements than a horse at full gallop, the analogy is surprisingly apt. For a string player to shift with maximum ease, the hand and wrist must have a split second of freedom from holding the instrument — a moment of release — so the wrist can react to the arm’s motion. That split second of suspension is not unlike the horse’s moment in mid-air.

What would your slow-motion picture of shifting look like? The moment of suspension — when the instrument is briefly released — is where efficient shifting lives.
The Mid-Air Moment: Releasing the Instrument to Shift
Key Concept: Just as a galloping horse has a split second suspended in mid-air as it switches from curling to straightening its legs, the string player must have a split second when the instrument is completely suspended — so the wrist can react to the arm’s motion of reaching to a lower position by simultaneously “falling back.” Because the releasing wrist helps reach the desired note, the upper arm moves less. Arriving at the destination note will feel like catching the instrument. It is also a more efficient motion, distributing movement across all the joints of the arm and hand rather than maintaining a rigid hand position.
This releasing of the hand from the wrist can be applied to all shifting from upper to lower positions. Scary as it may sound, the player must be able to “catch” the violin or viola upon arriving at the desired note. The weight of the instrument must be a nominal factor when shifting with speed.
This approach to shifting flies in the face of methods that encourage players to keep a “shifting finger down” while sliding up and down the fingerboard, maintaining constant contact. That approach, while widely taught, prevents the wrist from doing what it is naturally capable of.
Motion Study: Shifting and Vibrato Preparation
When working on this technique, it is recommended to practice over a cushion or other safe surface in case the instrument slips while developing balance.
- Drop the left hand and arm to the side.
- Bring up the forearm by bending the elbow, allowing the palm to face the body.
- Allow the forearm to drop back down, then up again a few times. Large movements are not necessary.
- Observe the reaction of the wrist and hand. What do these parts of the body do naturally in response to the movements of the upper arm and back?
- Notice the effortless back-and-forth of the hand. This is the wrist release that should be happening during every shift — the hand “falling back” to the lower position as a reaction to the arm’s movement, not as a forced action.
- Practice shifting without a specific pitch in mind. Sometimes aiming for a precise pitch inhibits the ability to release the wrist. First isolate the feeling of freedom in the arm. Accurate pitch — the batting average — is the end game, but the player must first find the freer feeling in the limbs.
The Wrist: React, Don’t Poke
Allowing the hand and wrist to react to the forearm — rather than maintaining a fixed position — is the key to fluid, efficient shifting.
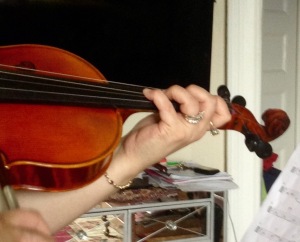
When the wrist is relaxed rather than poking outward, it is far easier to release the hand back when shifting from higher to lower positions.
It is common for teachers to instruct students to keep the wrist slightly bent outward — away from the instrument. But this posture is not the most effective, even if widely taught. The wrist has the capacity to respond to the movements of the forearm while accommodating the changing balance points of the fingers. Poking the wrist outward moves counter to the direction of the fingers — particularly when reaching with the 4th finger, which is already shorter and considered weaker than the rest.

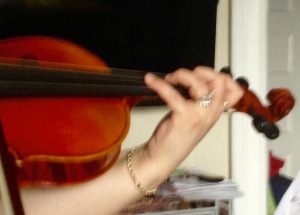
Finger Pad Balance
The balance of the hand and fingers is very much dictated by the fingers themselves. Allowing the wrist to bend slightly inward when reaching with the 4th finger is an economical use of the hand — and it is also wise not to baby the 4th finger, but to use it wherever appropriate.
Key Concept: A tactile sense in the fingertips is a good starting point. Exploring the variety of sensations that occur when touching different parts of the fingertip, the player will eventually find that the fatty center — where the nerve endings have the sharpest sensations — is also the best place to balance the finger on the string.
While efficient technique does require tracking distances on the fingerboard kinesthetically, keeping the fingers down without release prevents the hand from readjusting to new balance points when moving from one finger to the next. The ideal hand position is not static — it changes from one balance point to the next. The hand adjusts to every place on the fingerboard, and the body must balance on the most subtle level, requiring a refined sense of balance felt in the fingertips and the entire hand.
Last But Not Least: Let Go of the Grip
It will be impossible to balance the instrument in the manner described above if the player is gripping it with the head and shoulders like a human vice. That tightening of the upper extremity will manifest throughout the rest of the arm, wrist, and shoulder — making the wrist release impossible and the shifting study above unworkable.
Patience and joyful awareness are key. The destination matters in terms of practice goals — but when micro-practicing to transform basic playing patterns, let the path stay joyful and interesting.
by Rozanna Weinberger
0 comments